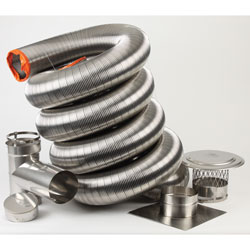
How to Build Your Own DIY Chimney Liner Kit
 Installing stainless steel liners is not hard. It helps if you know a little about what you are doing. It’s also good to have the proper chimney liner products for your job. A DIY Chimney liner kit is a good way to make sure you have all of the liner parts you need for your specific reline job. The problem with most liner kits is that they come in standard sizes and standard lengths. Not all chimneys are created equal, so what do you do when you need something besides a standard size chimney liner kit? The answer to this question is easy. In our Online “Shop”, we have set it up so you can create your own DIY chimney liner kit. No longer are you stuck with what you don’t need. Put together a diy chimney liner kit that will fit the needs of your chimney. All you have to do is follow the instructions on this page to choose your liner parts. Then, when you find what you need, place your order.
How to Build Your Own DIY Chimney Liner Kit
You can create a diy chimney liner kit using Homesaver Pro or UltraPro liner parts. You will need 5 basic parts if installing your chimney liner kit to a woodstove. If the liner is going to a fireplace insert, there are 4 primary parts you will need. The instructions below will help you to determine the proper chimney liner parts to complete your kit.
How to Measure for Your Chimney Liner Size
The stainless steel chimney liner is the most important part of your diy chimney liner kit. Getting the proper fitting chimney liner kit is of utmost importance. Choosing the correct size stainless steel chimney liner is the first thing you will want to do. Following the steps below will provide you with the best chimney liner for your installation.
- Step One- How to Choose the Proper diameter liner— When choosing the diameter chimney liner to use, you should focus on the appliance that you will be connecting to the liner. As a rule of thumb, you want to use a liner that is as close to the the appliance outlet size as possible without going smaller. This will give you the best possible draft and allow your appliance to burn as efficient as possible. Despite what you may think or have heard, a bigger liner is not always better. Measure the appliance outlet or check the specs to see what diameter liner you need to use. Most modern woodstoves will use a 6″ or an 8″ liner
- Step Two- How to Measure Your Chimney Flue— The next thing you’ll need to do is measure the inside of the flue the liner will be installed in. There is nothing worse than ordering a chimney liner kit and finding out that the liner will not fit into the chimney flue. Take a tape measure and a good bright light to the chimney top. Measure the inside width and length of the flue. Use the light to shine down the flue to look for possible size variations. If possible, take the same measurement at the bottom of the chimney flue and compare sizes of top and bottom. For easiest and safest installation, you will need at least one inch of space around your liner. Example: A 6″ liner should go into a flue with dimensions at least 8″ x 8″.
- Step Three- How to Determine your liner length-– Most standard stainless steel chimney liner kits provide you with flexible chimney liner lengths of 25′, 30′, and 35′. In most instances you end up with more liner than you need. If you don’t measure properly, you may not have enough liner. The DIY chimney liner kit will allow you to get the length of chimney liner you need. To measure properly, you will need one person at the chimney top with a tape measure and one at the bottom at the thimble or in the fireplace firebox. Lower the tape down the flue to the person at the bottom. They should hold the tape at the approximate area where the liner will meet the appliance. The person at the chimney top will record the chimney length. If the flue is straight, add 1 foot to 18″ to the length. If the flue has offsets, add 2′ to the length. This will allow for variations in the length while going around offsets. It will also leave enough liner to work with and make connections during installation.
You’re Ready to Choose Your Liner
You have now taken all of the measurements you need to choose your liner for your diy chimney liner kit. Now that you know the diameter and length of the stainless steel chimney liner you need, click on the Button below to go to the “SHOP” and put your liner in the “Cart”. You will have the choice between Homesaver Pro or UltraPro chimney liners. When you have finished, come back here. You’ll learn how to choose the other parts you will need to finish your diy chimney liner kit.
No comments yet.